 - Cakes by MK")
 - Cakes by MK")
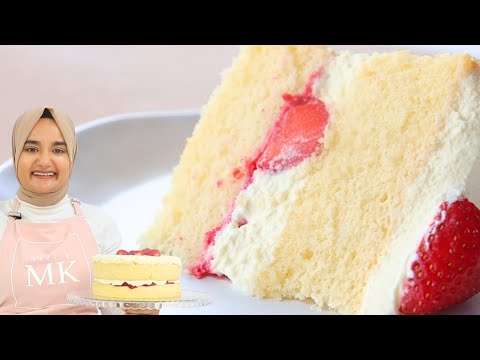
This better than bakery sponge cake recipe is light, airy, and just straight up DELICIOUS! It’s so versatile that you can pair it with literally anything. I love filling mine like a classic Victorian sponge cake with my homemade raspberry filling recipe and whipped cream – YUM!

What is a Sponge Cake?
A sponge cake is a light and airy cake that is made primarily from whipped egg whites. Unlike other types of cake, such as butter or oil cakes, sponge cakes do not contain much fat which contributes to it’s light texture.
Sponge cake is often used as a base for other desserts, such as layered cakes, trifle, or as a component in various French-style pastries. It can also be served on its own, dusted with powdered sugar or paired with fresh fruit and whipped cream like a Victorian sponge cake (which is how I love mine!).
What makes this recipe stand out?
I am so proud of my sponge cake recipe and it is no doubt my favourite sponge I’ve tried, with the simple reason being – I don’t use that much flour!
Some flour is needed to help with the structure of the cake, however many recipes I’ve tried I feel use way too much and just end up being too heavy (almost like a regular cake). What I’ve done instead is substituted a lot of the flour with cornstarch, which helps thicken the batter without forming more gluten than we need. This results in the softest, airiest, bakery like sponge cake!
How to make Sponge Cake
Now I’m not going to sugar coat it, sponge cakes are a little more challenging to master than regular cakes! BUT, if you carefully follow the steps below you should end up with the perfect sponge 🙂
Begin by preheating your oven to 160 °C (320°F) with the fan on (see note 2 on recipe card if you don’t have a fan function) and line the bottom of two 8×3 inch baking tins with baking paper without greasing the bottom. Leave the sides of the cake tins ungreased and bare (do not line with baking paper). This will prevent the cakes from shrinking once they’re baked.

In a bowl combine your flour, cornstarch, baking powder and salt. Mix until well combined (you do not need to sift it yet). Set aside.
In a medium sized bowl add in the egg whites and white vinegar, and using a hand or stand mixer, whip on a medium high speed for 30 seconds until foamy. Gradually add in 1/3 cup of the sugar and then continue mixing for a further 2 minutes. Then turn your mixer down to low and mix for a further minute (about 4 minutes of mixing altogether). You should end up with stiff peaks (see note 3 on recipe card). Set aside.


In a large bowl add in your remaining 1/3 cup of white sugar and warm water. Mix so that the sugar is coated in the water. Add in the egg yolks and vanilla, and with a hand or stand mixer, whip on a medium high speed for 4 minutes, and then turn the mixer down to low and mix for a further minute (5 minutes of mixing altogether). Your mixture should now be thick and you should be able to create ribbons with it when you lift it up with a spoon.
Stream the vegetable oil into the egg yolk mixture while mixing on a medium speed. Mix until well combined.


Add in half or your egg whites to your egg yolk mixture, and using a spatula gently fold together until just combined. Then sift in your dry ingredients, and gently fold through until just combined.
Finish off by adding in the remaining egg whites and gently fold until just combined. You can use your spatula to break up any large chunks of unmixed egg whites but try not to push out too many of the air bubbles and do not overmix.

Distribute the batter into your baking tins and then tap your baking tins lightly on your counter. Then run a thin knife or toothpick through the batter to remove any large air bubbles and then bake for 25 minutes. To test whether they’re done, gently touch the tops and it should create a little indent which slowly bounces back.

Once the sponges are done, immediately tap them on the counter from a height of about 10cm, and lay them upside down (while still in their baking tins) on a wire rack to completely cool (see note 4 on recipe card).

Once cooled (about an hour later), run a thin knife around the edges to release the cakes from the cake tins, and then turn them out onto a wire rack.
To make my cake layers look nice and neat, I gently rub my fingers around the edges and the top and that removes the dark crust on the sides and tops of the cake (see video for demonstration).

APPLY SIMPLE SYRUP: Combine sugar and hot water together for the simple syrup and mix until the sugar is completely dissolved. Using a pastry brush, generously brush the top and sides of the sponges with the simple syrup (see note 5 on recipe card).

How to Decorate a Sponge Cake
You can decorate your sponge cake however you like 🙂 but I like to fill mine with raspberry filling, strawberries and cream – YUM!
Place one sponge cake layer down, and cover the top with a thin layer of my raspberry jam filling.

Place strawberries on top (I like to cut mine in half and place them upside down). Cover with generous amount of whipped cream and spread it out evenly with an offset spatula or knife.
Place your next sponge cake layer on top and then cover with more whipped cream. Finish decorating with more strawberries on top. Enjoy!


Light & Airy Sponge Cake Recipe
Print Pin VideoIMPORTANT: For accuracy, I would recommend using the gram measurements provided, as those are the exact quantities I use. Cup measurements are given as estimates (based on US cup measurements) to make it easier for those who do not have a scale.
Ingredients
Sponge Cake
- ⅓ cup (40 g) flour - regular, all purpose (see note 1)
- ½ cup (60 g) cornstarch
- ¼ tsp baking powder
- ¼ tsp salt
- 4 large eggs - whites and yolks separated, room temperature
- ⅛ tsp white vinegar
- ⅔ cup (132 g) white granulated sugar - separated in half - ⅓ cup (66g) for the egg whites & ⅓ cup (66g) for the egg yolk mixture.
- 1½ tbsp warm water - not boiling
- 2 tsp vanilla essence/extract
- 2 tbsp (30 g) unflavoured vegetable oil - I use canola
Simple Syrup
- ½ cup (100 g) white granulated sugar
- ½ cup (110 g) boiling water
Whipping Cream
- 2 cups (375 g) cold whipping cream
- 2 tsp icing sugar - also known as confectioners sugar/powdered sugar
- ½ tsp vanilla essence/extract
- 1 punnet fresh strawberries for decorating
Raspberry Jam
Instructions
Sponge Cake
- Preheat oven to 160 °C (320°F) with the fan on (see note 2 if you don't have a fan function) and line the bottom of two 8x3 inch baking tins with baking paper without greasing the bottom. Leave the sides of the cake tins ungreased and bare (do not line with baking paper).
- In a bowl combine your flour, cornstarch, baking powder and salt. Mix until well combined (you do not need to sift it yet). Set aside.
- In a medium sized bowl add in the egg whites and white vinegar, and using a hand or stand mixer, whip on a medium high speed for 30 seconds until foamy. Gradually add in 1/3 cup of the sugar and then continue mixing for a further 2 minutes. Then turn your mixer down to low and mix for a further minute (about 4 minutes of mixing altogether). You should end up with stiff peaks (see note 3). Set aside.
- In a large bowl add in your remaining 1/3 cup of white sugar and warm water. Mix so that the sugar is coated in the water. Add in the egg yolks and vanilla, and with a hand or stand mixer, whip on a medium high speed for 4 minutes, and then turn the mixer down to low and mix for a further minute (5 minutes of mixing altogether). Your mixture should now be thick and you should be able to create ribbons with it when you lift it up with a spoon.
- Stream the vegetable oil into the egg yolk mixture while mixing on a medium speed. Mix until well combined.
- Add in half of your egg whites to your egg yolk mixture, and using a spatula gently fold together until just combined.
- Then sift in your dry ingredients, and gently fold through until just combined.
- Finish off by adding in the remaining egg whites and gently fold until just combined. You can use your spatula to break up any large chunks of unmixed egg whites but try not to push out too many of the air bubbles and do not overmix.
- Distribute the batter into your baking tins and then tap your baking tins lightly on your counter. Then run a thin knife or toothpick through the batter to remove any large air bubbles and then bake for 25 minutes. To test whether they're done, gently touch the tops and it should create a little indent which slowly bounces back.
- Once the sponges are done, immediately tap them on the counter from a height of about 10cm, and lay them upside down (while still in their baking tins) on a wire rack to completely cool (see note 4).
- Once cooled (about an hour later), run a thin knife around the edges to release the cakes from the cake tins, and then turn them out onto a wire rack.
- To make my cake layers look nice and neat, I gently rub my fingers around the edges and the top and that removes the dark crust on the sides and tops of the cake (see video for demonstration). I find the dark crust on sponge cakes are also what contain that slight eggy after taste sometimes, which is why I prefer to remove it.
- APPLY SIMPLE SYRUP: Combine the sugar and hot water together for the simple syrup and mix until the sugar is completely dissolved. Using a pastry brush, generously brush the top and sides of the sponges with the simple syrup (see note 5). I use about 3/4s of the simple syrup mixture in total.
Whipped Cream
- In a large bowl add in the whipped cream, icing sugar and vanilla. Whip until you reach stiff peaks. Be careful not to overwhip the cream.
Assembly
- Place one sponge cake layer down, and cover the top with a thin layer of my raspberry jam filling.
- Place strawberries on top (I like to cut mine in half and place them upside down). Cover with generous amount of whipped cream and spread it out evenly with an offset spatula or knife.
- Place your next sponge cake layer on top and then cover with more whipped cream. Finish decorating with more strawberries on top. Enjoy!
Video
Notes
Nutrition
Nutritional information are estimates only as they are automatically calculated by a third party application. Actual values may differ based on brands and types of products used.


639 Comments
Hi! Can I make this with 4” round cake pans?
Hi Nina! 🙂 For two 4inch round cake pans, you would need to make 1/4 of the recipe which I usually do not recommend as this can effect the quality of the batter (in terms of how it bakes up). You could half the recipe, and then use it to either make four 4 inch cake layers, or two 4 inch cake layers and use the rest to make some cupcakes on the side. Just be sure to adjust the cooking time as the cakes will bake up faster. Hope that helps and hope you enjoy the recipe! 🙂
hi maryam, recipe for this cake is what i have been looking for, for sometime. my daughter loves it (and she hardly eat cakes!)
was wondering if i could turn this recipe into a chocolate or coffe sponge cake. look forward ro your reply. thanks again!
Hi Ida! So happy to hear you and your daughter have been loving the recipe 😀
I haven’t tried this recipe as a coffee sponge, though I have made a chocolate version that you can find here: https://cakesbymk.com/recipe/light-airy-chocolate-sponge-cake/
You could probably add a bit of instant coffee powder to the vanilla version for a coffee flavor, though I haven’t tried this myself so am not too sure if any other adjustments may be required (like extra sugar etc.)
Hope that helps 🙂
This recipe is perfect, the cake turned out amazing! I’ll definitely be using this recipe from now on. However, I was wondering how I would go about dying the sponge, in the future. Would you recommend liquid or gel food colouring? Also, when in the recipe would I add it? Thank you! 💕
Hi Bradley! Yayy I am so so happy to hear you loved the recipe and that it turned out amazing 😀
I would recommend using gel colors if you’d like to color the sponge and add it to the egg yolk mixture after streaming in the vegetable oil 🙂
Hope that helps and thank you so much again for the wonderful feedback 🙂
Do you have to put the vinegar in this recipe
Hi Linda! 🙂 I would recommend it, or you could use cream of tartar or a bit of lemon juice. Hope that helps and hope you enjoy the recipe!
Will this cake stay moist in the fridge for a couple days? Or will it dry out. And should I use baking strips around the pan for a level cake? Also, if I don’t have 8×3 inch pans, will 8×2 be ok?
hello! ive tried this recipe and i absolutely love it, my family too! its so delicious & soft! now im wondering if i could turn this in a roll cake? i have a 16×12 roll cake pan and was wondering if this recipe is enough for that, if the baking time and temp remains the same, and if it’ll be sturdy enough to roll once baked? cheers!
Hi Kal! So so happy to hear you enjoyed the recipe 😀 for a cake roll I would recommend checking out my Swiss roll cake recipe which has a similar soft sponge but is better for rolling 🙂
Hope you enjoy it!
Amazing, Absolutely love all cakes by MK their recipies are so easy to follow and always taste amazing
Thank you so much for the wonderful feedback 😀 so so happy to hear you’re enjoying the recipes 🙂 and what a cute name!! Thank you for all the love 🙂
I have a question, please. Can I bake this cake in advance and freeze it?
Hi Tazein! 🙂 I haven’t tried freezing the sponge cake layers myself, but I imagine it would be fine. Just be sure to wrap the cake layers well in cling wrap and then pop it into an airtight container before freezing. Enjoy!
Maryam I just wanted to let you know how much I enjoy your videos and look forward to every one I can find! You are such an accomplished baker and you are so much younger than me. I am from the USA and I find you British (?) bakers are so very good and I am in awe. Would this cake be the same as angel food cake here in the USA? I am very much going to try it as it looks so good with the strawberries, my favorite fruits. God Bless you little sister and this old lady (I am 66) would love to adopt you! Your Mom much be very proud of you. Love and Blessings! Sheree
Hi Sheree! 🙂 Thank you so much for the wonderful feedback, I’m so so happy to hear you’re enjoying the videos! I am from New Zealand 🙂
This recipe here is a sponge cake and is a bit different to an angel food cake in that it uses egg yolks and has butter. I do hope to share an angel food cake recipe sometime soon 🙂
Aww thank you so much for your kind and thoughtful compliments Sheree, they really do mean a lot 😀 really appreciate all the love and support 🙂
Hi,I substitute granulated sugar with castor sugar and still turn out good!Now your blog is my main reference for baking cakes😍
Hi Sue! 🙂 So happy to hear the cake still came out awesome with the caster sugar! So happy to hear you’ve been enjoying the recipes too! Really appreciate all the support 😀