This better than bakery chocolate sponge cake recipe is light, airy, moist and just straight up DELICIOUS! Paired with my homemade raspberry jam filling, and chocolate whipped cream, you are going to simply fall in love with this cake! This recipe is based on my original light and airy sponge cake 🙂

What is a chocolate sponge cake?
A chocolate sponge cake is basically a regular sponge cake, but with cocoa added in. It’s a light and airy cake that is made primarily from whipped egg whites. Unlike other types of cake, such as butter or oil cakes, sponge cakes do not contain much fat which contributes to it’s light texture.
Much like regular sponge cakes, chocolate sponge cakes are often used as a base for other desserts, such as layered cakes, trifle, or as a component in various French-style pastries. It can also be served on its own, dusted with powdered sugar or paired with fresh fruit and whipped cream like a Victorian sponge cake (which is how I love mine!).
What makes this recipe stand out?
Much like my original sponge cake recipe, the simple reason behind this truly light and ‘better than bakery’ sponge cake is that… I don’t use that much flour!
Some flour is needed to help with the structure of the cake, however many recipes I’ve tried I feel use way too much and just end up being too heavy (almost like a regular cake). What I’ve done instead is substituted a lot of the flour with cornstarch, which helps thicken the batter without forming more gluten than we need. This results in the softest, airiest, bakery like sponge cake!
How to make chocolate sponge cake
I’ve said this before and I’ll say it again – sponge cakes can be tricky! BUT, they are totally doable. I’ve tried to provide as much detail as possible in my written recipe so that you have the best chances of success!
Begin by preheating your oven to 160 °C (320°F) with the fan on (see note 2 on recipe card if you don’t have a fan function) and line the bottom of two 8×3 inch baking tins with baking paper without greasing the bottom. Leave the sides of the cake tins ungreased and bare (do not line with baking paper). This will prevent the cakes from shrinking once they’re baked.

In a bowl combine your flour, cornstarch, baking powder, cocoa powder, instant coffee powder and salt. Mix until well combined (you do not need to sift it yet). Set aside.
In a medium sized bowl add in egg whites and white vinegar, and using a hand or stand mixer, whip on a medium high speed for 30 seconds until foamy. Gradually add in 1/3 cup of the sugar and then continue mixing for a further 2 minutes. Then turn your mixer down to low and mix for a further minute (about 4 minutes of mixing altogether). You should end up with stiff peaks (see note 3 on recipe card). Set aside.

Stream the vegetable oil into the egg yolk mixture while mixing on a medium speed. Mix until well combined.

Add in half or your egg whites to your egg yolk mixture, and using a spatula gently fold together until just combined. Then sift in your dry ingredients, and gently fold through until just combined.
Finish off by adding in the remaining egg whites and gently fold until just combined. You can use your spatula to break up any large chunks of unmixed egg whites but try not to push out too many of the air bubbles and do not overmix.


Distribute the batter into your baking tins and then tap your baking tins lightly on your counter. Then run a thin knife or toothpick through the batter to remove any large air bubbles and then bake for 25 minutes. To test whether they’re done, gently touch the tops and it should create a little indent which slowly bounces back.
Once the sponges are done, immediately tap them on the counter from a height of about 10cm, and lay them upside down (while still in their baking tins) on a wire rack to completely cool (see note 4 on recipe card).
Once cooled (about an hour later), run a thin knife around the edges to release the cakes from the cake tins, and then turn them out onto a wire rack.
To make my cake layers look nice and neat, I gently rub my fingers around the edges and the top and that removes the dark crust on the sides and tops of the cake (see video for demonstration).

APPLY SIMPLE SYRUP: Combine sugar and hot water together for the simple syrup and mix until the sugar is completely dissolved. Using a pastry brush, generously brush the top and sides of the sponges with the simple syrup (see note 5 on recipe card).

Cake filling options
To fill my sponge cake I like to whip up a batch of my raspberry jam filling and make some chocolate whipped cream!
For the raspberry filling head to my raspberry filling recipe 🙂

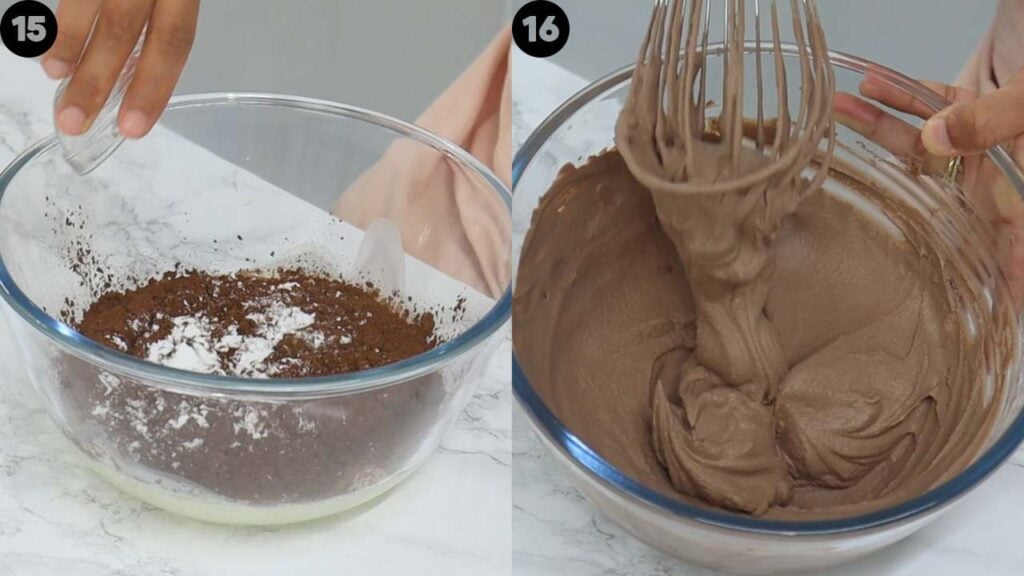
For the chocolate whipped cream, in a large bowl add in the whipped cream, icing sugar, cocoa powder and vanilla. Whip until you reach stiff peaks. Be careful not to overwhip the cream.
You can decorate your sponge cake however you like 🙂 but below is how I do mine.
Place one sponge cake layer down, and cover the top with a thin layer of my raspberry jam filling.
Place strawberries on top (I like to cut mine in half and place them upside down). Cover with generous amount of whipped cream and spread it out evenly with an offset spatula or knife.
Place your next sponge cake layer on top and then cover with more whipped cream. Finish decorating with more strawberries on top. Enjoy!


Light & Airy Chocolate Sponge Cake Recipe
IMPORTANT: For accuracy, I would recommend using the gram measurements provided, as those are the exact quantities I use. Cup measurements are given as estimates (based on US cup measurements) to make it easier for those who do not have a scale.
Ingredients
Sponge Cake
- 2 tbsp (15 g) flour - regular, all purpose (see note 1)
- ⅓ cup (40 g) cornstarch
- ¼ tsp baking powder
- 2 tbsp (16 g) cocoa powder - unsweetened
- 1 tsp instant coffee powder
- ¼ tsp salt
- 4 large eggs - whites and yolks separated, room temperature
- ⅛ tsp white vinegar
- ⅔ cup (132 g) white granulated sugar - separated in half (1/3 for the egg whites & 1/3 for the egg yolk mixture)
- 1½ tbsp warm water - not boiling
- 2 tsp vanilla essence/extract
- 2 tbsp (30 g) unflavoured vegetable oil - I use canola
Simple Syrup
- ¼ cup (50 g) white granulated sugar
- ¼ cup (55 g) boiling water
Whipping Cream
- 2 cups (375 g) cold whipping cream
- 3 tbsp (28 g) icing sugar - also known as confectioners sugar/powdered sugar
- 3 tbsp (22 g) cocoa powder - unsweetened
- ½ tsp vanilla essence/extract
- 1 punnet fresh strawberries for decorating
Raspberry Jam
Instructions
Sponge Cake
- Preheat oven to 160 °C (320°F) with the fan on (see note 2 if you don't have a fan function) and line the bottom of two 8x3 inch baking tins with baking paper without greasing the bottom. Leave the sides of the cake tins ungreased and bare (do not line with baking paper).
- In a bowl combine your flour, cornstarch, baking powder, cocoa powder, instant coffee powder and salt. Mix until well combined (you do not need to sift it yet). Set aside.
- In a medium sized bowl add in the egg whites and white vinegar, and using a hand or stand mixer, whip on a medium high speed for 30 seconds until foamy. Gradually add in 1/3 cup of the sugar and then continue mixing for a further 2 minutes. Then turn your mixer down to low and mix for a further minute (about 4 minutes of mixing altogether). You should end up with stiff peaks (see note 3). Set aside.
- In a large bowl add in your remaining 1/3 cup of white sugar and warm water. Mix so that the sugar is coated in the water. Add in the egg yolks and vanilla, and with a hand or stand mixer, whip on a medium high speed for 4 minutes, and then turn the mixer down to low and mix for a further minute (5 minutes of mixing altogether). Your mixture should now be thick and you should be able to create ribbons with it when you lift it up with a spoon.
- Stream the vegetable oil into the egg yolk mixture while mixing on a medium speed. Mix until well combined.
- Add in half of your egg whites to your egg yolk mixture, and using a spatula gently fold together until just combined.
- Then sift in your dry ingredients, and gently fold through until just combined.
- Finish off by adding in the remaining egg whites and gently fold until just combined. You can use your spatula to break up any large chunks of unmixed egg whites but try not to push out too many of the air bubbles and do not overmix.
- Distribute the batter into your baking tins and then tap your baking tins lightly on your counter. Then run a thin knife or toothpick through the batter to remove any large air bubbles and then bake for 20 minutes. To test whether they're done, gently touch the tops and it should create a little indent which slowly bounces back. You can check with a toothpick too, and if it comes out clean it's ready.
- Once the sponges are done, immediately tap them on the counter from a height of about 10cm, and lay them upside down (while still in their baking tins) on a wire rack to completely cool (see note 4).
- Once cooled (about an hour later), run a thin knife around the edges to release the cakes from the cake tins, and then turn them out onto a wire rack.
- To make my cake layers look nice and neat, I gently rub my fingers around the edges and the top and that removes the dark crust on the sides and tops of the cake (see video for demonstration).
- APPLY SIMPLE SYRUP: Combine the sugar and hot water together for the simple syrup and mix until the sugar is completely dissolved. Using a pastry brush, generously brush the top and sides of the sponges with the simple syrup (see note 5).
Whipped Cream
- In a large bowl add in the whipped cream, icing sugar, cocoa powder and vanilla. Whip until you reach stiff peaks. Be careful not to overwhip the cream.
Assembly
- Place one sponge cake layer down, and cover the top with a thin layer of my raspberry jam filling.
- Place strawberries on top (I like to cut mine in half and place them upside down). Cover with a generous amount of whipped cream and spread it out evenly with an offset spatula or knife.
- Place your next sponge cake layer on top and then cover with more whipped cream. Finish decorating with more strawberries on top. Enjoy!
Video

Notes
Nutrition
Nutritional information are estimates only as they are automatically calculated by a third party application. Actual values may differ based on brands and types of products used.










51 Comments
I tried this but you think the buttercream and chocolate ganache will work with this base as I think it’s too soft to handle the weight other than light whipped cream