 - Cakes by MK")
 - Cakes by MK")
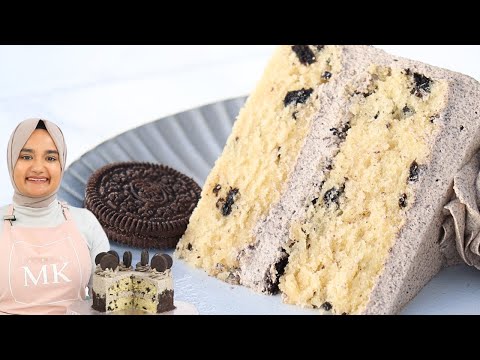
If you’re a cookies and cream lover, then you are going to literally fall in love with this incredibly soft Oreo cake! This recipe consists of soft vanilla and Oreo cake layers, topped with a super smooth Oreo buttercream frosting – YUM!

How to Make Oreo Cake
Although this Oreo cake looks SPECTACULAR, I promise it isn’t that difficult to make 🙂
As always, the full ingredients list and written instructions are on the recipe card at the end of the post!
Begin by preheating your oven to 160 °C (320°F) with the fan on (see note 4 on recipe card below if you don’t have a fan function) and grease and/or line two 8 inch cake tins (I use my homemade cake release).
Next you want to roughly chop 14 Oreos to mix into the cake batter at the end. You don’t want them to be too big or too small (you want little chucks). Set aside for now.

In a bowl, sift together your flour, cornflour, baking soda, baking powder and salt. Using a whisk or fork, mix until well combined. Set aside.
In another bowl, add in your butter, vegetable oil and sugar. Using an electric mixer (hand or stand mixer are both fine – see note 2 on recipe card below), cream together for 2 minutes until light and creamy.

Add in eggs one by one, mixing well in between each addition (about 10-15 seconds between eggs).
Add in your vanilla, vinegar and half a cup of the buttermilk (112g), and mix until well combined. Now set your mixer aside as the remainder of the batter will be finished by hand.

Next add in half of your premixed dry ingredients to your wet mixture, and gently fold it in with a spatula until just combined. Then add in the remaining 1 cup of buttermilk (225g) , and fold it in until just combined. Lastly, add in the remaining dry ingredients and gently fold it into the mixture until just combined. Do not overmix (see note 3).
Finish off by adding in the roughly chopped Oreos from earlier and gently mix with the spatula until just combined. Do not overmix.


Distribute the batter evenly into the two 8 inch cake tins, and bake for 33 minutes or until a toothpick comes out clean.
Once baked, allow the cake layers to cool in the cake tins for about 15-20 minutes, and then turn them out onto a wire rack to completely cool.

How to make Oreo buttercream
In a food processor (or blender), place in the 14 Oreos and blend until they resemble fine crumbs. Set aside for now.
In the bowl of a stand mixer, add in the icing sugar, butter, vanilla and milk.

Using the paddle attachment, mix on the lowest speed until the ingredients are combined (about a minute), and then turn up the speed to a medium high and mix for a full 10 minutes. Scrape the bowl down half way through.
Finish off by adding in the crumbed Oreos from earlier and mix on a medium speed until well combined.

How to assemble/decorate your Oreo cake
Now you can totally exercise your creative freedom here, but here is how I did mine 🙂
OPTIONAL: Trim off the caramelised edges on the top, bottom and sides of the cake layers with a serrated knife. This is purely for aesthetic purposes so you can skip this step if you prefer. Level the tops if necessary.
Place the first cake layer onto your cake stand and place a generous amount of Oreo buttercream on top and smooth it out with an offset spatula or knife.
Next crush three Oreos in the palms of your hands and sprinkle them on top of the buttercream. These chunks of Oreos will add great texture and crunch to your cake.

Place your next cake layer on top and cover the top and sides with buttercream, leaving a little left for piping on the top. I like to use a cake scraper to smooth out the sides.

Place the remaining buttercream in a piping bag with a 1M piping tip on it, and pipe little swirls around the top edges of the cake.
In a food processer, blend another 4 Oreos until they resemble fine crumbs. Using your hands, gently push the Oreo crumbs up against the sides of the cake until about half way up. They should stick to the buttercream. Remove any excess Oreo crumbs from the bottom.
Finish off by adding individual Oreos on the top of each swirl that was piped on the top of the cake. Enjoy!


Soft Oreo Cake (Cookies & Cream)
Print Pin VideoIMPORTANT: For accuracy, I would recommend using the gram measurements provided, as those are the exact quantities I use. Cup measurements are given as estimates (based on US cup measurements) to make it easier for those who do not have a scale.
Ingredients
Oreo Cake
- 14 Oreos - roughly chopped
- 2⅓ cups (300 g) flour - regular all purpose (see note 1 if you want to use cake flour)
- ¼ cup (25 g) cornstarch
- ½ tsp baking soda
- 1 tsp baking powder
- ½ tsp salt - omit if using salted butter
- ½ cup (113 g) unsalted butter - room temperature
- ½ cup (105 g) unflavoured vegetable oil - I use canola
- 1⅔ cups (332 g) white granulated sugar
- 3 large eggs - room temperature
- 1¼ tbsp vanilla essence/extract
- 1 tsp white vinegar
- 1½ cups (337 g) buttermilk - room temperature, see note 5 if using a homemade buttermilk substitute
Oreo Buttercream Frosting
- 14 Oreos - blended to fine crumbs
- 1½ cups (340 g) unsalted butter - room temperature
- 2¾ cups (350 g) icing sugar - also known as powdered sugar/confectioners sugar
- 1½ tsp vanilla essence/extract
- 1½ tbsp milk - heavy or whipping cream okay too
Extra for Decorating (optional)
- 3 Oreos (recommended) - to go it between the cake layers to add extra crunch/texture
- 4 Oreos (optional) - to decorate the sides of the cake (blended into fine crumbs)
- 10-12 Oreos (optional) - to put on the top of the cake
Instructions
- IMPORTANT: For this recipe I would highly recommend using gram measurements, especially for the flour for accurate results. It has a high fat/liquid ratio so slight adjustments to the quantities can throw off the balance of the cake 🙂
Oreo Cake
- Preheat oven to 160 °C (320°F) with the fan on (see note 4 if you don't have a fan function) and grease and/or line two 8 inch cake tins (I use my homemade cake release).
- Begin by roughly chopping 14 Oreos to mix into the cake batter at the end. You don't want them to be too big or too small (you want little chucks). Set aside for now.
- In a bowl, sift together your flour, cornflour, baking soda, baking powder and salt. Using a whisk or fork, mix until well combined. Set aside.
- In another bowl, add in your butter, vegetable oil and sugar. Using an electric mixer (hand or stand mixer are both fine - see note 2), cream together for 2 minutes until light and creamy.
- Add in eggs one by one, mixing well in between each addition (about 10-15 seconds between eggs).
- Add in your vanilla, vinegar and half a cup of the buttermilk (112g), and mix until well combined. Now set your mixer aside as the remainder of the batter will be finished by hand.
- Next add in half of your premixed dry ingredients to your wet mixture, and gently fold it in with a spatula until just combined. Then add in the remaining 1 cup of buttermilk (225g) , and fold it in until just combined. Lastly, add in the remaining dry ingredients and gently fold it into the mixture until just combined. Do not overmix (see note 3).
- Finish off by adding in the roughly chopped Oreos from earlier and gently mix with the spatula until just combined. Do not overmix.
- Distribute the batter evenly into the two 8 inch cake tins, and bake for 33 minutes or until a toothpick comes out clean.
- Once baked, allow the cake layers to cool in the cake tins for about 15-20 minutes, and then turn them out onto a wire rack to completely cool.
Oreo Buttercream Frosting
- In a food processor (or blender), place in the 14 Oreos and blend until they resemble fine crumbs. Set aside for now.
- In the bowl of a stand mixer, add in the icing sugar, butter, vanilla and milk.
- Using the paddle attachment, mix on the lowest speed until the ingredients are combined (about a minute), and then turn up the speed to a medium high and mix for a full 10 minutes. Scrape the bowl down half way through.
- Finish off by adding in the crumbed Oreos from earlier and mix on a medium speed until well combined.
Assembly (demonstrated in video)
- OPTIONAL: Trim off the caramelised edges on the top, bottom and sides of the cake layers with a serrated knife. This is purely for aesthetic purposes so you can skip this step if you prefer. Level the tops if necessary.
- Place the first cake layer onto your cake stand and place a generous amount of Oreo buttercream on top and smooth it out with an offset spatula or knife.
- Next crush three Oreos in the palms of your hands and sprinkle them on top of the buttercream. These chunks of Oreos will add great texture and crunch to your cake.
- Place your next cake layer on top and cover the top and sides with buttercream, leaving a little left for piping on the top. I like to use a cake scraper to smooth out the sides.
- Place the remaining buttercream in a piping bag with a 1M piping tip on it, and pipe little swirls around the top edges of the cake.
- In a food processer, blend another 4 Oreos until they resemble fine crumbs. Using your hands, gently push the Oreo crumbs up against the sides of the cake until about half way up. They should stick to the buttercream. Remove any excess Oreo crumbs from the bottom.
- Finish off by adding individual Oreos on the top of each swirl that was piped on the top of the cake. Enjoy!
Video
Notes
Nutrition
Nutritional information are estimates only as they are automatically calculated by a third party application. Actual values may differ based on brands and types of products used.


238 Comments
Hi, i really hope you’ll reply this. Can i reduce the sugar to make it less sweet cause some of my guest are diabetic. If so, how much to reduce? And can i make this into a tall cake? 4 layers.. I want to make a 3d duck cake for my kid. Is it sturdy enough?
Hi Mimi! 🙂 Yes you can reduce the sugar by upto about 1/4 cup (50g) in the cake recipe, but I wouldn’t recommend anymore than that as sugar contributes to the moisture of the cake. For the frosting, you can reduce it by about 1/2 a cup. Yes 4 layers should be fine as well 🙂
If you’re carving the cake, I am not too sure how well the cake layers will hold up as they are quite soft – you could maybe freeze the cake layers to make them easier to carve (just wrap them well and place into an airtight container before freezing) 🙂
Hope you enjoy the recipe!
Hey, I was just wondering if you could make this cake in a 9×13 cake pan. I’m not an expert in making layer cakes just yet. The cake looks absolutely delicious. Thank you!
Hi Jake! 🙂 Yes you should be able to make this cake in a 9×13 inch pan, you may just need to reduce the cook time slightly (I would check around the 25min mark and then bake more if needed). Most of my recipes that make two 8 inch cake layers can be made into one 9×13 inch pan 🙂
Hope you enjoy the recipe Jake!
This was a hit. Very good recipe. Can this be used for cupcakes as well
Awesome! So happy you enjoyed the recipe Tonya 😀
Yes you could totally turn these into cupcakes, you would just need to reduce the cook time to around the 18 min mark 🙂
I made this for my nephew’s birthday this weekend – it was delicious! Everyone loved it. Thanks for sharing the recipe!
Thanks so much for the feedback Rachel! 😀 So glad to hear everyone loved the recipe 🙂
Im currently making your Oreo cake for a 4 years old boy, thanks for all these wonderful recipes
Im in South Africa
Awesome! So happy to hear you’re enjoying the recipes Lerato 🙂 much love from NZ to South Africa!
Hi
Can we freeze the sponge cake?
Hi Uzma! 🙂 I haven’t tried freezing these cake layers myself though others have with success! Just be sure to wrap the cake layers well in cling wrap, and pop them into an airtight container before freezing. Hope that helps and hope you enjoy the recipe 😀
I have frozen these and they come out great
I can’t wait to try your cake! Can this be baked in 3, 9-inch pans?
I’m guessing I would need to double the recipe and then bake for less time?
Hi Sariah! 🙂 Yes I would recommend doubling the recipe for three 9 inch pans, and the cook time will depend on how much batter is in the cake tins 🙂
If the height of the batter in the cake tins looks roughly the same as the original recipe, then the cook time will be about the same. Just keep a close eye on the cakes to ensure they aren’t over/underbaking. Be careful not to check them too early too as this can cause the cakes to sink. Hope that helps and hope you enjoy the recipe 😀
amazing
Thank you! 😀
Hi MK,
Is cake flour the same as self raising flour? Or different? Just want to know what to pick up from the shops in Australia. Therefore will
Thanks
Hi Stacey 🙂 Great question! Cake flour and self raising flour are different. Cake flour is a flour that has a low protein content but no raising agents, so you’ll still need to use baking powder/baking soda. Self raising flour has raising agents mixed into it, so you generally don’t need to use any additional leavening agents in the recipe. Sometimes baking soda is still called for in recipes using self-raising flour (sometimes if there is acid in the recipe like lemon juice). Hope that helps! 🙂
Hi there!
Can this recipe be baked into layers that are slightly deeper and then split?
We always bake 2 cakes that are at least 2″ deep and then split them both to create 4 layers. I’ve found some recipes can’t do this.
Many thanks, it looks great!
Hi Holly! 🙂 Hmm good question – this recipe produces quite a soft cake and so I am inclined to think that it would not be ideal for torting. The additional little chunks of biscuit in the cake batter may also make it a bit harder to torte, given the crumb is on the more delicate side. If you decide to try it out anyway I would love to hear how you go 🙂