 - Cakes by MK")
 - Cakes by MK")
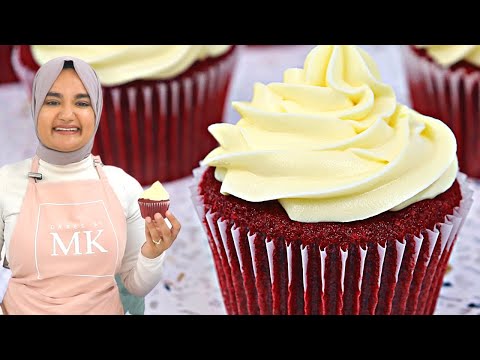
Get ready for the softest red velvet cupcakes you will ever have! These cupcakes are so moist, bursting with flavour, and are topped with the most incredible cream cheese frosting.

What makes these red velvet cupcakes so soft?
There’s a few different elements at play here, starting off with some of the ingredients:
- This recipe uses a cake flour substitute (a mixture of all purpose flour and cornstarch – cake flour is actually banned here in New Zealand which is why I can’t just use regular cake flour!). Cake flour has a lower protein content than regular flour, which results in a more tender crumb.
- Secondly, this recipe uses a combination of butter and oil. Butter adds flavour, and substituting some of it with oil really amps up the softeness! Because oil is liquid at room temperature, this resuls in a super moist cupcake.
- Thirdly, this recipe uses buttermilk. Buttermilk helps to break down the protein in the flour, resulting in a fluffier cake. It also reacts with the baking soda in this recipe, helping to leaven the batter.
Another factor is the mixing method. This recipe uses an electric mixer at first, but when it comes to folding in the dry ingredients at the end, you want to use your hands. By being ‘gentle’ with the flour, you’re going to prevent too much gluten from forming (which is great for things like bread, but we don’t want TOO MUCH gluten in a cake!).
How to make red velvet cupcakes
These cupcakes come together really easily. Begin by preheating your oven to 160°C fan forced, and line a cupcake tray with cupcake liners.

For the cupcake batter, start off by sifting together your dry ingredients. By premixing our dry ingredients, it helps ensure that everything is mixed well, preventing us from overmixing our batter when we come to combining our wet and dry ingredients.

Set your dry ingredients aside and in another bowl cream together your butter, oil and sugar for 2-3 minutes. This is going to incorporate air into our batter which will give us a fluffier cupcake!

Next add in your eggs one by one, mixing well in between each addition. Eggs add structure and moisture to our cupcake.

Next add in the vanilla, white vinegar and red liquid food colouring and mix until well combined.

Now the last step is to fold in our dry ingredients while alternating with our buttermilk. So to do this, add in half of your dry ingredients and fold it into the wet mixture until just combined. Then add in your buttermilk, and fold that through until just combined. Lastly, add in your remaining dry ingredients and fold through until just combined.
It’s important to do this step by hand as this will prevent us from overmixing our batter and developing too much gluten. Gluten is what gives bread great structure, and although we want SOME structure for our cupcakes, we don’t want too much otherwise it’ll make our cupcakes tough and dense.


Once the batter is done, evenly distribute it into the cupcake liners (fill them about 1/2 way up – don’t overfill) and bake for 18 minutes, or until a toothpick comes out clean.

Once done, let them cool in the cupcake tray for 10-15 minutes, and then place them on a wire rack to completely cool. In the meantime prepare your cream cheese buttercream.

How to make cream cheese buttercream
This cream cheese frosting comes together SO EASILY! It’s a small batch of my regular cream cheese buttercream recipe. For additional tips and information, refer to that blog post 🙂
You want to start off by creaming your butter for a few minutes until it’s light and fluffy. This is going to give your frosting a lighter texture.
Next you want to add in your icing/confectioners sugar in 3 batches, whilst mixing on a low speed. This is going to ensure that our icing sugar doesn’t go everywhere!

Then add in your cold cream cheese, vanilla essence/extract and fresh lemon juice. Mix on a medium high speed just until the frosting is smooth. Avoid over-mixing as this can result in a less stable frosting.

And that is it! You should end up with an incredibly delicious, not-too-sweet cream cheese buttercream.

How to frost your cupcakes
You can get creative and frost your cupcakes however you like! I frosted mine with a 1M piping tip. I started by cutting the tip of a piping bag and placing my piping tip in it.
I then folded the piping big over onto my hand and filled it with my cream cheese buttercream.

I then piped a cupcake swirl on the cupcake. To do this, start on one edge of the cupcake, go around and then slowly bring the piping bag into the middle of the cupcake as you keep piping, until the cupcake is fully covered. It’s a little hard to explain, but I have a great beginners piping tutorial you can check out on YouTube, as well as a 1M cupcake piping tutorial for more ideas 🙂

And that is it! You’re left with beautiful red velvet cupcakes ready to eat! 🙂

Soft Red Velvet Cupcakes
Print Pin VideoIMPORTANT: For accuracy, I would recommend using the gram measurements provided, as those are the exact quantities I use. Cup measurements are given as estimates (based on US cup measurements) to make it easier for those who do not have a scale.
Ingredients
Red Velvet Cupcakes
- 1¼ cups (150 g) flour - regular, all purpose (see note 1 if you want to use cake flour)
- 1½ tbsp (9 g) cornflour - also known as cornstarch
- 1½ tbsp (7 g) cocoa powder - unsweetened
- ¼ tsp baking soda
- ½ tsp baking powder
- ¼ tsp salt - omit if using salted butter
- 3 tbsp (43 g) unsalted butter - room temperature
- ⅓ cup (70 g) unflavoured vegetable oil - I use canola
- 1 cup (200 g) white sugar
- 2 large eggs - room temperature
- ½ tbsp vanilla essence/extract
- ¾ tsp white vinegar
- 1¾ tbsp red liquid food colour
- ⅓ cup (75 g) buttermilk - room temperature
Cream Cheese Buttercream
- ½ cup (112 g) unsalted butter - room temperature
- 2¼ cups (285 g) icing sugar - also known as confectioners/powdered sugar
- ¾ cup (168 g) cream cheese - cold, firm type (see note 2)
- ¾ tsp vanilla essence/extract
- ¾ tbsp lemon juice - must be fresh
Instructions
Red Velvet Cupcakes
- Preheat oven to 160 °C (320°F) with the fan on (see note 6 if you don't have a fan function) and line a cupcake tray with cupcake liners.
- In a bowl, sift together your flour, cornflour, cocoa powder, baking soda, baking powder and salt. Using a whisk or fork, mix until well combined. Set aside.
- In another bowl, add in your butter, vegetable oil and sugar. Using an electric mixer (hand or stand mixer are both fine - see note 3), cream together for 2-3 minutes until light and creamy.
- Add in eggs one by one, mixing well in between each addition (about 10-15 seconds between eggs).
- Add in your vanilla, vinegar and red liquid food colour, and mix until well combined. Now set your mixer aside as the remainder of the batter will be finished by hand.
- Finish off by adding in half of your premixed dry ingredients to your wet mixture, and gently fold it in with a spatula until just combined. Then add in all of your buttermilk, and fold it in until just combined. Lastly, add in the remaining dry ingredients and gently fold it into the mixture until just combined. Do not overmix (see note 4).
- Distribute the batter evenly into the cupcake liners (only fill about 1/2 way up), and bake for 18 minutes or until a toothpick comes out clean. Avoid overbaking the cupcakes otherwise they will dry out.
- Once baked, allow them to cool in the cupcake tin for about 10-15 minutes, and then place them onto a wire rack to completely cool. In the meantime prepare the cream cheese buttercream.
Cream Cheese Buttercream
- Cream your butter for a few minutes until it's light and fluffy. Either use a hand mixer or stand mixer on a medium high speed. If using a stand mixer, use the paddle attachment.
- Add in the icing sugar in 3 batches while mixing on low. Ensure that each batch of icing sugar is mixed into the butter well before adding in the next batch.
- Next add in your cold cream cheese, vanilla and fresh lemon juice. Mix just until the frosting is smooth. Avoid over-mixing (see note 5).
- Once the cupcakes are completely cool, frost with the cream cheese buttercream. I used a 1M piping tip to pipe my frosting. See blog post above or recipe video below to see how I did this 🙂
Video
Notes
Nutrition
Nutritional information are estimates only as they are automatically calculated by a third party application. Actual values may differ based on brands and types of products used.


115 Comments
Always will be my favourite red velvet cupcakes to make a decorate!! You honestly can’t go wrong with this recipe
Thanks so much Aishah! So glad you’re loving the recipe 😀
Your instructions were easy to understand and it was straight to the point. I like the fact that in addition to the written instructions you added pictures, it makes it so much easier to see how its supposed to be.
Thanks Alvita! So glad you enjoyed the recipe 🙂
My go to red velvet recipe for the pillow soft texture AND flavourrrrr love it love it love it
Thanks so much for the wonderful feedback Stephan! So glad you’re enjoying the recipe 😀
My daughter is wanting mini cupcakes for her graduation party. Can this recipe be used for smaller cupcakes?
Hi Amy!
Yes absolutely, you’d just need to reduce the cook time to ensure they don’t overbake 🙂
Hope that helps and hope your daughter has/had a wonderful graduation!