Chocolate Icebox Cake
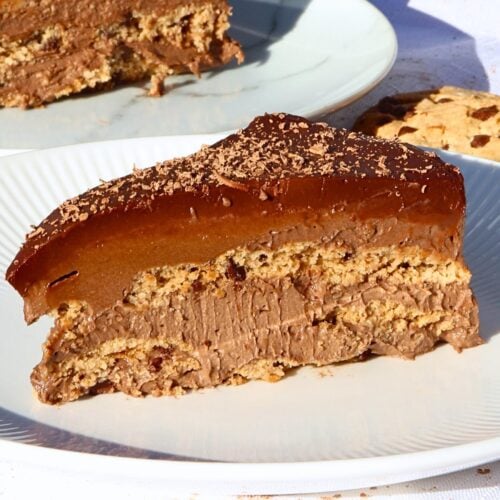
Print Pin VideoThis icebox cake is creamy, chocolatey, and layered with softened cookies that turn perfectly cake-like after chilling. It’s an easy no-bake dessert that feels rich and indulgent while being so simple to make!
IMPORTANT: For accuracy, I would recommend using the gram measurements provided, as those are the exact quantities I use. Cup measurements are given as estimates (based on US cup measurements) to make it easier for those who do not have a scale.
Ingredients
Ganache
- 1 cup (170 g) semi-sweet chocolate - roughly chopped. I use 50% dark chocolate
- ¾ cup (180 g) heavy cream
- 1 tbsp (15 g) unsalted butter
Icebox Cake
- 2¼ cups (540 g) cold whipping cream - divided into ¼ cup (60g) and 2 cups (480g)
- 1½ cups (337 g) mascarpone - cold
- ¾ cup (90 g) powdered sugar - also known as icing/confectioners' sugar
- ½ cup (50 g) cocoa powder - Dutch processed preferred
- 1 tsp vanilla essence/extract
- 1 family pack chocolate chip cookies - any firm, crunchy cookie like Chips Ahoy or Griffins. Two standard packs will work too.
- ½ cup (120 g) whole milk - cold
- semi-sweet chocolate - for grating on top (optional)
Instructions
Chocolate Ganache
- In a microwave-safe bowl, combine the semi-sweet chocolate, heavy cream, and butter.
- Microwave in 20-second bursts, whisking well between each burst, until the mixture is smooth and fully melted. Be careful not to overheat it.
- Place the ganache in the refrigerator to cool and thicken slightly while you prepare the filling. It should remain pourable (see note 1).
Icebox Cake
- In a large bowl, combine the powdered sugar, cocoa powder, vanilla extract, ¼ cup (60 g) cold heavy cream, and mascarpone.
- Using a hand mixer or stand mixer fitted with the whisk attachment, mix on low speed for about 10 seconds, then increase to medium-high speed and beat until smooth and well combined.
- Add the remaining 2 cups (480g) of heavy cream and mix on low speed until mostly combined. Increase to medium speed and whip just until stiff peaks form (see note 2). Be careful not to overwhip.
Assembly
- Pour the milk into a shallow bowl. Quickly dip each cookie into the milk, then arrange them in an even layer across the bottom of a 9-inch (23 cm) springform pan. Break cookies as needed to fill any gaps.
- Spread one-third of the chocolate cream filling evenly over the cookie layer.
- Repeat with another layer of dipped cookies and another one-third of the filling.
- Add a final layer of dipped cookies, then spread the remaining filling evenly over the top, smoothing the surface as much as possible.
- Remove the ganache from the refrigerator and stir until smooth. Pour it over the top of the cake and gently spread or tilt the pan so it reaches the edges.
- Cover the cake and refrigerate for at least 6 hours, or overnight, to allow the cookies to soften into a cake-like texture.
- Once chilled, run a small sharp knife around the edge of the pan and carefully remove the sides of the springform pan. Smooth any rough edges with an offset spatula if desired. Grate semi-sweet chocolate over the top for decoration (it also covers any imperfections!)
- For clean slices, dip a large knife in hot water and wipe it dry between cuts. Slice and serve cold (see note 3).
Video
Notes
Note 1. The ganache is refrigerated to allow it to cool slightly before being poured over the cake. It should still be smooth, runny, and pourable when ready to use, so avoid making it too far in advance, as it may thicken too much and become difficult to spread.
Note 2. The more the cream is whipped, the firmer the filling will become, making it harder to spread. Only whip until stiff peaks form.
Note 3. Be careful if transferring the cake to a serving plate, as the bottom of the springform pan can't be removed and can therefore cause the cake to slide when placed on a slippery surface. I've almost dropped the cake a few times while placing it on a glass cake stand because I'm so used to cakes being secured to the stand!
Nutrition
Calories: 493kcal | Carbohydrates: 21g | Protein: 6g | Fat: 44g | Saturated Fat: 27g | Polyunsaturated Fat: 1g | Monounsaturated Fat: 8g | Trans Fat: 0.1g | Cholesterol: 106mg | Sodium: 40mg | Potassium: 222mg | Fiber: 3g | Sugar: 16g | Vitamin A: 1395IU | Vitamin C: 0.4mg | Calcium: 111mg | Iron: 2mg
Nutritional information are estimates only as they are automatically calculated by a third party application. Actual values may differ based on brands and types of products used.
Tried this recipe?I love hearing from you! Tag me @cakesbymk.nz on instagram so I can see your amazing creations :)